Yorkshire pudding is a classic British side dish known for its golden, crispy outside and soft, airy inside. It is made with a simple mixture of eggs, flour, milk, water, and salt. The batter is baked in very hot fat until it rises and forms a light, hollow center. This space inside makes Yorkshire puddings perfect for holding gravy and meat juices.
Although the word pudding may make you think of a sweet dessert, this traditional dish is savory. It is commonly served with roast beef, vegetables, and gravy. You can make individual puddings in a muffin tin, larger ones in a popover pan, or a family-sized version in a cast-iron skillet.
The recipe uses everyday ingredients, but a few simple techniques can help you achieve a better result. Letting the batter rest, heating the fat properly, and baking the puddings at a high temperature all help create their signature texture. You can also prepare the batter in advance, making this recipe easier to manage when you are cooking a large meal.
What Makes Yorkshire Pudding Special?
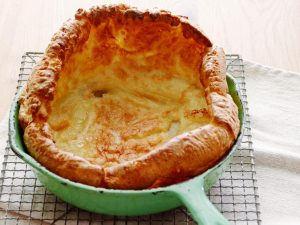
A good Yorkshire pudding has a crisp, deep-golden shell and a light interior. Depending on how you prepare the batter and which pan you use, the center may be very hollow or form a deeper cup. Both styles are useful for serving with gravy.
The magic happens when the wet batter meets the hot fat. The heat quickly turns moisture into steam, which helps the batter expand. As it rises, the outside begins to set and brown while the inside remains airy. The finished pudding is much lighter than its simple ingredients might suggest.
The balance between flour and liquid is important. The batter should be thin enough to pour easily, rather than thick like bread dough. Eggs help provide structure, while milk adds flavor and tenderness. A small amount of water makes the finished puddings lighter and crisper.
The fat also plays an important role. Beef drippings give Yorkshire puddings a rich, traditional flavor, especially when they are served with roast beef. Lard and shortening are other options, while vegetable oil offers a more neutral taste. Clarified butter can also be used if you want to make the puddings without beef drippings.
Why Resting the Batter Helps
One of the most useful steps in this recipe is allowing the batter to rest. You can leave it at room temperature for at least 30 minutes, but preparing it the night before often gives even better results.
During resting, the flour has time to absorb the liquid. The batter also changes as its proteins and starches settle and develop. When baked, a rested batter can produce a more flexible interior with larger air pockets. This creates a pleasing contrast between the crisp outside and the softer inside.
If you want the best possible texture and have enough time, prepare the batter the previous evening and keep it in an airtight container in the refrigerator. It can be refrigerated for up to three days. Take it out while the oven heats so it is not extremely cold when you pour it into the hot pan.
If you are short on time, do not worry. A 30-minute rest is still useful, and the puddings can also be baked immediately after mixing. They may have a slightly different texture, but this simple recipe is flexible enough for everyday cooking.
Choosing the Right Temperature
Yorkshire puddings need a hot oven to rise properly. This recipe uses 450°F (230°C), which provides enough heat to make the batter expand quickly while helping the outside become golden and crisp.
Place the oven rack in the center so the puddings receive even heat. Avoid using the convection setting for this recipe. A conventional oven is the recommended choice.
The fat should also be very hot before the batter goes into the pan. When the batter touches the hot fat, it starts cooking straight away. This initial heat helps the puddings rise and can reduce sticking.
The exact importance of preheating the pan depends on the type of pan you use. Thin metal muffin and popover tins heat quickly, so they are more forgiving if they have not been heated for long. Heavy cast-iron skillets need more attention because they take longer to heat. For the tallest and most evenly shaped puddings, preheat the fat until it is smoking hot, as described in the method.
How the Ingredients Work Together
Each ingredient has a purpose, and keeping the measurements balanced helps produce consistent results.
Eggs: Four large eggs give the batter structure and help it rise. Whole eggs provide a useful balance between richness, tenderness, and crispness. Using more yolks can make the pudding richer and more custard-like, while extra whites can encourage a taller, crisper result. This recipe uses whole eggs for a balanced texture.
All-purpose flour: Flour gives the pudding its structure. The recipe uses 150 grams, which creates a pourable batter when combined with the measured liquids. Adding too much flour can make the batter thicker and change how the puddings rise.
Whole milk: Milk adds moisture, flavor, and tenderness. It also contributes to the browning of the outside. The recipe uses 175 grams of whole milk.
Water: The additional 25 grams of water helps make the puddings lighter and crisper without making the interior too dry. Plain water works well, so there is no need to replace it with sparkling water.
Kosher salt: A small amount of salt improves the flavor of the batter and balances the mild taste of the flour and milk.
Cooking fat: Beef drippings provide the traditional savory flavor, but lard, shortening, and vegetable oil are also suitable. Use the specified quantity and divide it evenly among the chosen pans or wells.
Getting the Batter Smooth
Start by measuring all the ingredients before mixing. Add the eggs, flour, milk, water, and salt to a medium bowl. Whisk everything together until no dry flour remains and the batter looks smooth.
The batter should be thin and easy to pour. Whisking helps combine the ingredients evenly, but there is no need to treat the mixture like bread dough. You are making a liquid batter that will expand rapidly in the oven.
Once the batter is smooth, leave it to rest for at least 30 minutes. If you are preparing it ahead, transfer it to an airtight container and refrigerate it overnight or for up to three days. Remember to take it out while the oven is preheating.
A rested batter is especially helpful if you want a stretchy interior with large bubbles. Those air pockets make the puddings useful for holding gravy, onion sauce, or the juices from a roast.
Selecting a Pan
This recipe can be made in different pans, depending on how you want to serve the puddings.
- Cast-iron skillets: Two 8-inch skillets produce larger puddings. They are useful when you want to serve a generous portion or make a traditional skillet-style pudding.
- Popover tins: Two six-well popover tins can make eight puddings when the batter is divided as directed, although the quantity may not fill every well to the top. You can increase the recipe by 50% if you want twelve full popovers.
- Standard muffin tins: A 12-well muffin tin creates individual puddings that are easy to serve with a roast dinner.
- Mini muffin tins: A 24-well mini muffin tin makes smaller portions that can be served as bites or starters.
The pan affects the final shape more than the basic method. Smaller puddings usually cook faster, while larger ones need more time to rise and brown. Whatever pan you choose, make sure it is suitable for oven use and handle it carefully after heating.
Step-by-Step Guide to Making Yorkshire Puddings
Step 1: Prepare the Batter
Add the four large eggs, 150 grams of all-purpose flour, 175 grams of whole milk, 25 grams of water, and 2 grams of kosher salt to a medium bowl.
Use a whisk to mix everything together until the batter is smooth. Check the bottom and sides of the bowl to make sure no dry flour is left behind. The finished mixture should be thin enough to pour easily.
Let the batter rest at room temperature for at least 30 minutes. For the best texture, place it in an airtight container and refrigerate it overnight. You can keep it refrigerated for up to three days. If you have chilled the batter, remove it from the refrigerator while the oven heats.
Step 2: Heat the Oven and Fat
Place the oven rack in the center and preheat the oven to 450°F (230°C). Use a conventional oven rather than the convection setting.
Divide the 100 milliliters of cooking fat evenly between your chosen pans. You can use two 8-inch cast-iron skillets, two six-well popover tins, one 12-well standard muffin tin, or one 24-well mini muffin tin.
Put the pans in the oven for about 10 minutes, until the fat is smoking hot. This step is important because the batter needs strong heat from the beginning to rise well.
Be careful when removing the pans. Hot fat can splash, and the pans will be extremely hot. Set them on a heatproof surface before adding the batter.
Step 3: Pour in the Batter
Carefully divide the batter between the prepared wells or skillets. For individual puddings, fill each well about halfway to three-quarters full. If you are using skillets, pour the batter so it reaches about one-quarter of the way up the sides.
Work carefully but promptly. The hot fat helps the batter start cooking as soon as it enters the pan. Once you have divided the batter, return the pans to the oven immediately.
Avoid filling the wells too high because the batter needs room to expand as it rises. Distribute it as evenly as possible so the puddings cook at a similar rate.
Step 4: Bake Until Tall and Golden
Bake the Yorkshire puddings until they have risen dramatically, become deep brown, and feel crisp on the outside. When gently tapped, they should sound hollow.
Smaller puddings generally need about 15 minutes, while popover-sized puddings and skillet-sized versions usually take around 25 minutes. The exact time depends on the pan, the size of the puddings, and your oven.
Look for a well-browned exterior rather than relying only on the clock. The puddings should have expanded significantly and developed a crisp shell. Do not remove them while they are still pale or soft.
Step 5: Serve or Store
Yorkshire puddings are best served immediately while they are hot and crisp. Place them on the table as soon as they are ready and serve them with gravy, roast beef, or your favorite savory accompaniments.
If you are not serving them straight away, let them cool completely. Transfer the cooled puddings to a zipper-lock freezer bag and freeze them for up to three months. Reheat them in a hot toaster oven before serving so the outside becomes crisp again.
Common Yorkshire Pudding Mistakes to Avoid
Using batter that is too thick: A thick mixture may not expand in the same way as a thin, pourable batter. Measure the ingredients carefully and whisk until the mixture is smooth.
Skipping the resting time: You can bake the batter immediately, but resting gives the flour time to absorb the liquid and can improve the flavor and interior texture. If possible, prepare the batter the night before.
Not heating the fat enough: The hot fat helps the batter begin cooking quickly. Give the pans about 10 minutes in the hot oven and wait until the fat is smoking hot before adding the mixture.
Using a heavy pan without preheating it: Cast iron needs time to become hot. A cold, heavy pan can absorb heat before the batter begins to rise. Preheating is especially useful when making a large Yorkshire pudding in a skillet.
Taking the puddings out too early: The outside needs time to become deeply golden and crisp. Use the suggested cooking times as a guide and check the color, rise, and texture before removing them.
Making the batter too rich with extra yolks: Extra egg yolks make the interior richer and more custard-like, but they do not necessarily produce the lightest, crispest pudding. Whole eggs provide a good balance in this recipe.
Adding sparkling water instead of plain water: Sparkling water does not improve the rise in this recipe. Plain water gives the desired result, so there is no need to use a carbonated drink.
Using too much or too little fat: The fat helps the puddings rise and affects their texture. Measure it carefully and divide it evenly between the pans or wells.
Should You Open the Oven While Baking?
You may have heard that opening the oven door will ruin Yorkshire puddings. Although keeping the oven closed is a useful habit, testing has shown that opening the door briefly does not automatically stop them from rising.
Still, it is better to let the puddings bake without unnecessary interruptions. Every oven is different, and repeatedly opening the door can affect the temperature. Watch through the oven window when possible, and wait until the puddings are well risen and browned before removing them.
The most important things are the batter consistency, the hot fat, the oven temperature, and enough baking time. You do not need to worry that one quick look will destroy the whole batch.
How to Serve Yorkshire Puddings
Yorkshire puddings are traditionally served with roast beef and gravy. Their crisp edges and hollow centers make them ideal for soaking up rich meat juices. They also pair well with roasted vegetables, potatoes, and other savory dishes.
For a classic dinner, arrange the warm puddings beside slices of roast beef and spoon gravy over or inside them. If you prefer, serve them as a separate first course before bringing the meat and vegetables to the table.
You can also use the hollow centers for other savory fillings. Thick onion gravy is a delicious option, and a rich, reduced French onion soup can work like a gravy when thickened to the right consistency. For breakfast, try a warm Yorkshire pudding with a poached egg and hollandaise sauce.
Serve them promptly because they lose heat quickly. Their crisp texture is at its best straight from the oven, so have the plates and other dishes ready before the puddings finish baking.
Can You Prepare Yorkshire Puddings Ahead?
Yes. Preparing the batter ahead is one of the easiest ways to make this recipe more convenient. Mix the ingredients, cover the batter in an airtight container, and refrigerate it overnight. The batter can remain refrigerated for up to three days.
When you are ready to cook, take the batter out as the oven preheats. Then heat the fat, divide the batter between the pans, and bake according to the recipe.
You can also bake the puddings in advance and freeze them. Allow them to cool completely before packing them in a zipper-lock freezer bag. They can be frozen for up to three months. Reheat them in a hot toaster oven before serving.
For the best results, avoid leaving cooked puddings sitting for a long time before serving. Reheating can restore some crispness, but freshly baked puddings offer the best contrast between the outside and the airy center.
Short Recipe
Yorkshire Puddings
Description
Classic British Yorkshire puddings with crisp, golden exteriors and light, airy centers. Serve them hot with roast beef, gravy, or your favorite savory dishes.
Duration
Prep time
5 minutes
Cook time
30 minutes
Resting time
30 minutes
Total time: 1 hour 5 minutes
Yield: 8 Yorkshire puddings
Ingredients
- 4 large eggs (200 g; 7 ounces)
- 150 g all-purpose flour (5.25 ounces; about 1 cup plus 2 teaspoons)
- 175 g whole milk (6 ounces; ¾ cup)
- 2 g kosher salt (about ½ teaspoon)
- 25 g water (0.85 ounces; 1 tablespoon plus 2 teaspoons)
- 100 ml beef drippings, lard, shortening, or vegetable oil (about ½ cup)
Instructions
- Add the eggs, flour, milk, water, and salt to a medium bowl. Whisk until the batter is smooth.
- Let the batter rest at room temperature for at least 30 minutes. For the best results, cover it in an airtight container and refrigerate overnight or for up to three days. Take it out while the oven heats.
- Set the oven rack in the center and preheat the oven to 450°F (230°C). Do not use the convection setting.
- Divide the cooking fat between two 8-inch cast-iron skillets, two six-well popover tins, one 12-well standard muffin tin, or one 24-well mini muffin tin.
- Place the pans in the oven for about 10 minutes, until the fat is smoking hot.
- Carefully remove the pans and place them on a heatproof surface. Divide the batter evenly between the wells, filling them halfway to three-quarters full. If using skillets, fill them about one-quarter full.
- Return the pans to the oven immediately. Bake until the puddings have risen significantly, are deep brown, feel crisp, and sound hollow when tapped. Smaller puddings take about 15 minutes; popover- and skillet-sized puddings take around 25 minutes.
- Serve immediately. To store for later, let the puddings cool completely, place them in a zipper-lock freezer bag, and freeze for up to three months. Reheat in a hot toaster oven before serving.
Tips & Tricks
- For the best texture and flavor, rest the batter overnight.
- Make sure the fat is smoking hot before adding the batter.
- Use plain water rather than sparkling water.
- If using skim or low-fat milk, omit the water and increase the milk to 200 g (7 ounces; 1 cup minus 2 tablespoons).
- The batter quantity may not fill two standard six-well popover tins completely. Increase the recipe by 50% if you want twelve full popovers.
- Have your meal ready before the puddings finish baking, as they are best served hot.