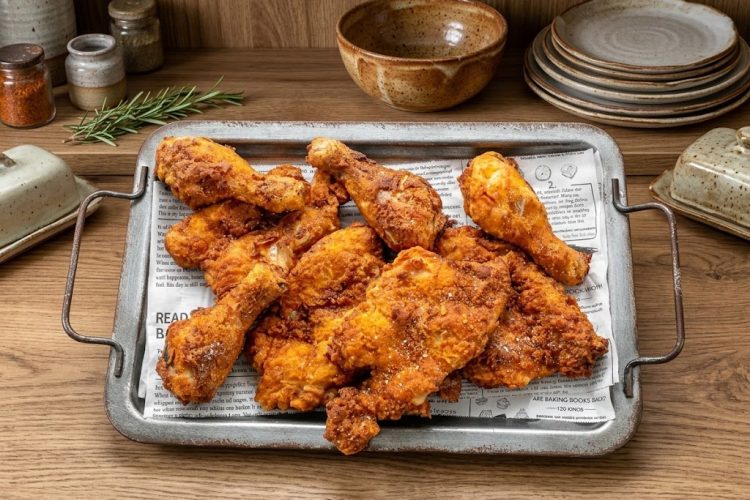
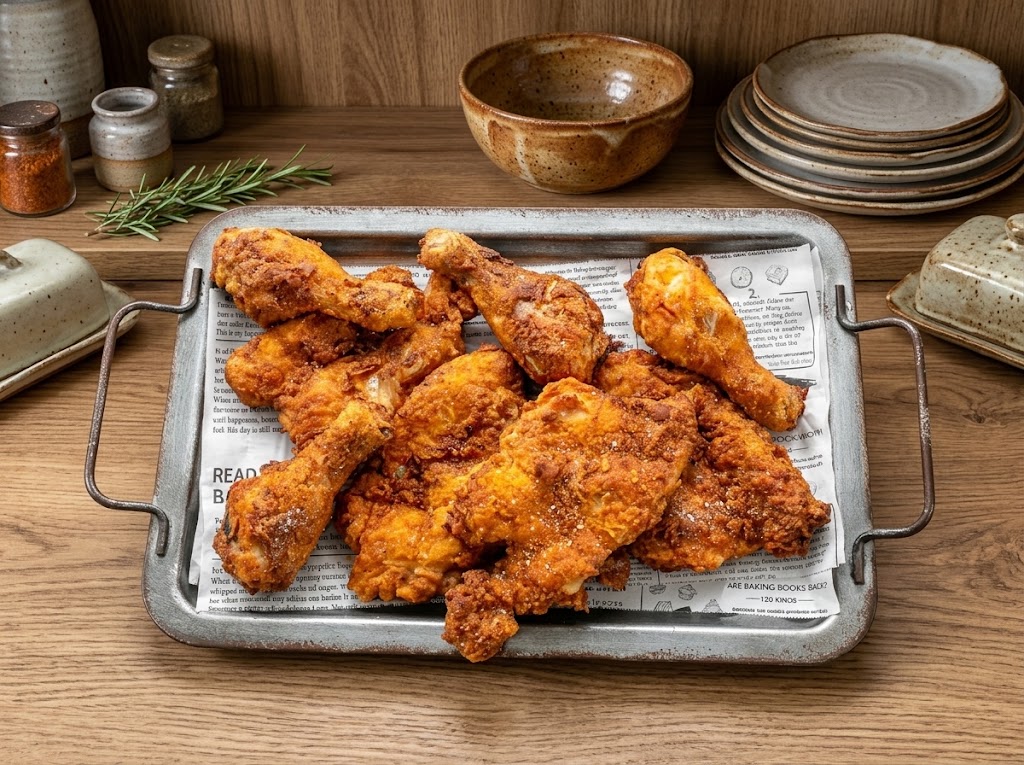
If you enjoy crispy fried chicken but want to avoid deep frying, this air fryer KFC chicken is a practical choice. The chicken is soaked in buttermilk, coated in seasoned flour, and cooked in the air fryer until the outside is crisp and browned.
The buttermilk marinade helps keep the chicken moist while the seasoned coating adds plenty of savory flavor. Air frying also means you need much less oil than traditional deep frying, while still giving the chicken a crisp coating.
This recipe includes both boneless, skin-on chicken thighs and bone-in chicken legs. Since the two cuts cook at different speeds, they are prepared separately so each piece has enough time to become fully cooked and crispy.
Why Air Fry KFC-Style Chicken?
Traditional fried chicken is usually cooked in a large amount of hot oil. That method can produce a very crisp crust, but it also requires more oil and a larger amount of cleanup.
An air fryer uses circulating hot air to cook the coated chicken. A light spray of oil helps the flour coating brown and crisp while the chicken cooks underneath.
The result is not exactly the same as chicken submerged in oil, but it gives you a satisfying crispy coating with a much simpler cooking process. It is especially useful when you want homemade fried chicken without setting up a deep fryer.
The Role of Buttermilk
Buttermilk is an important part of this recipe because the chicken rests in it before being coated. The liquid surrounds the chicken and helps keep the meat moist during cooking.
The chicken should be left in the buttermilk overnight according to the original method. This makes the recipe easier to prepare ahead because the marinating stage can be completed the day before cooking.
Keeping the chicken refrigerated during the marinade is important. Once the chicken has finished marinating, it can be removed from the refrigerator and prepared for the seasoned coating.
Choosing the Chicken
The original recipe uses four boneless chicken thighs with the skin on and four bone-in chicken legs with the skin on. Using both cuts gives you a mixture of textures and sizes on the serving plate.
Boneless thighs generally cook more quickly than bone-in legs. This is why the original method recommends cooking the legs first and preparing the thighs afterward.
Try to keep the chicken pieces separated while coating them. This makes it easier to cover all sides evenly and reduces the chance of bare patches in the flour coating.
Preparing the Buttermilk Marinade
Start by placing 2 cups of buttermilk in a large bowl. Add the chicken pieces and make sure they are surrounded by the buttermilk.
Cover the bowl with plastic wrap and place it in the refrigerator overnight. The longer resting period gives the buttermilk time to work with the chicken before cooking.
When you are ready to cook, remove the chicken from the refrigerator. Keep the marinade because a small amount will be used to create the irregular pieces in the coating.
Making the Seasoned Coating
Combine the flour with the spices, salt, and nutritional yeast if using. The original recipe lists the seasoning ingredients individually, although several ingredient names are missing from the supplied recipe-card text.
Use a large baking dish or bowl for the dry mixture. A wide container makes it easier to coat the chicken without forcing the pieces together.
The seasoned flour is the part that develops the crisp exterior in the air fryer. Make sure the dry ingredients are mixed well before adding the chicken.
Creating Crispy Craggily Bits
One useful part of this recipe is adding about 1/4 cup of the buttermilk marinade to the flour mixture. Mix it through the flour to create small irregular pieces.
These little pieces cling to the chicken and form a rougher coating. When they cook in the air fryer, they become browned and crisp.
This step gives the coating more texture than simply dipping wet chicken into completely dry flour. Work the buttermilk into the flour until you have some small clumps without turning the whole mixture into a paste.
Preparing the Chicken Legs
The bone-in chicken legs should be cooked first because they require more time than the boneless thighs. Preheat the air fryer before adding the coated chicken.
Remove each leg from the buttermilk and place it into the seasoned flour mixture. Coat every side thoroughly, then gently tap off any loose excess flour.
The coating should cover the chicken without forming an extremely thick layer. Make sure the flour reaches around the sides and other exposed surfaces of each piece.
Air Frying the Chicken Legs
Set the air fryer to 370°F and place the coated chicken legs into the basket. Spray the pieces well with oil before starting the cooking process.
Cook the chicken legs for approximately 22–24 minutes. Check them halfway through cooking to see whether any areas of the flour coating still look dry.
If you notice dry or floury patches, spray those areas lightly with oil. There is no need to flip the chicken pieces during cooking.
Why You Should Not Flip the Chicken
The original method specifically recommends leaving the chicken in the same position. Flipping the pieces can disturb the coating and cause some of the crispy flour layer to come away from the chicken.
The upper surface is also the part you want to become browned and crisp. Keeping the chicken stationary allows that coating to remain intact as it cooks.
Instead of flipping, simply inspect the chicken halfway through cooking. If any floury areas remain dry, a little additional oil spray can help them brown.
Checking the Chicken Legs
Air fryer cooking times can vary depending on the appliance and the size of the chicken pieces. The 22–24 minute cooking time is therefore a useful guide rather than an absolute rule.
The chicken should be fully cooked before serving. If you use a meat thermometer, check the thickest part of the chicken without touching the bone.
Once the legs are cooked, remove them from the air fryer. Keep the crisp coating intact as you transfer them to the prepared rack.
Keeping the Cooked Chicken Warm
If you are preparing the thighs after the legs, the cooked legs need somewhere to rest while the remaining chicken cooks. The original method uses a wire rack placed over a parchment-lined baking sheet.
Immediately sprinkle the cooked chicken with the listed topping. Then place the legs on the wire rack.
If necessary, the rack can be placed in an oven on its lowest setting to keep the chicken warm while the thighs finish cooking. A wire rack helps prevent the underside from becoming overly soft.
Preparing the Chicken Thighs
The boneless, skin-on chicken thighs are coated using the same basic method as the legs. Remove each piece from the buttermilk and coat it thoroughly in the seasoned flour.
Tap off excess flour before transferring the thighs to the air fryer. This helps keep the coating neat while allowing the hot air to circulate around the chicken.
Because the thighs are boneless, they generally require less cooking time than the bone-in legs. Follow the separate temperature and timing given for this part of the recipe.
Air Frying the Chicken Thighs
Cook the coated chicken thighs at 350°F for 15 minutes. Check them halfway through the cooking period for any dry or floury areas.
If you see pale flour patches, spray those spots lightly with oil. As with the chicken legs, there is no need to flip the thighs.
Keeping the chicken in one position helps protect the coating. It also allows the exposed upper surface to become progressively more browned and crisp.
Increasing the Heat for Crispiness
After the first 15 minutes, increase the air fryer temperature to 360°F. Continue cooking for another 4–5 minutes.
This final period helps deepen the color of the coating and gives the chicken a crispier finish. Watch the chicken closely during these last few minutes.
When the coating is browned and crisp on top, remove the thighs from the air fryer. Immediately add the listed topping as directed in the original recipe.
How to Get a Crisp Coating
Dry flour spots are one of the main things to look for during cooking. If the flour remains completely dry, it may stay pale instead of developing the browned appearance you want.
A light spray of oil can help these areas cook and brown. You do not need to soak the coating in oil; the goal is simply to moisten obvious dry patches.
Avoid overcrowding the air fryer basket. Space around the chicken allows hot air to circulate and helps the coating cook more evenly.
Cooking Different Chicken Cuts
Cooking the chicken legs and thighs separately is one of the most useful parts of this recipe. Bone-in legs naturally need more time than boneless thighs.
If both types of chicken were cooked together from the beginning, one cut could become overcooked while the other was still finishing. Separating them gives you better control.
The same principle applies if you are making a different quantity. Keep pieces of similar size together whenever possible so the cooking process is easier to manage.
Preparing the Rack and Baking Sheet
The original method places a wire rack over a baking sheet lined with parchment paper. This setup is used after cooking the chicken and makes cleanup easier.
The rack also allows air to move underneath the cooked pieces instead of leaving the crispy coating directly against a flat surface. This can help protect the texture while you finish the rest of the batch.
If you are making all the chicken at once in separate batches, the rack provides a convenient place to hold the finished pieces while the remaining chicken cooks.
Serving Air Fryer KFC Chicken
Serve the chicken while it is warm and freshly cooked. The crispy coating is at its best soon after the chicken leaves the air fryer.
Dipping sauces are an easy way to serve this chicken. You can choose your favorite sauce according to the type of flavor you want with the seasoned coating.
Coleslaw also makes a good side because its cool, crunchy texture contrasts with the warm chicken. The chicken can also be served with other simple sides for a complete dinner.
Making a Crispy Chicken Sandwich
The boneless chicken thighs can be turned into sandwiches instead of served as whole pieces. Place a crispy thigh inside a bun with shredded lettuce and sliced pickles.
Iceberg lettuce works particularly well because it adds crunch without overpowering the chicken. Spicy mayonnaise can also be added for extra heat and creaminess.
This is a useful way to serve leftover boneless thighs as a different meal. Reheat the chicken first so the coating becomes warm and crisp again before assembling the sandwich.
Serving With Dips and Sides
The chicken works with many familiar side dishes. Coleslaw is one option mentioned in the original serving suggestions, while dipping sauces can be placed alongside the chicken.
Hot honey can also be drizzled over the finished chicken for a sweet and spicy contrast. Add it just before serving so the coating remains as crisp as possible.
For a larger meal, serve the chicken with vegetables, salad, or another favorite side. Since the chicken is already seasoned and coated, the sides do not need complicated preparation.
Marinating Overnight
Overnight marinating is one of the key preparation suggestions in the original recipe. It allows you to complete the longest part of the preparation before the day you plan to cook.
Place the chicken and buttermilk in a covered container and refrigerate it. When cooking day arrives, the chicken can move directly into the coating process.
Planning ahead also makes this recipe easier when serving a family dinner. The chicken is already marinated, leaving only the coating and air frying steps to complete.
Air Fryer KFC Chicken Recipe
 Recipe by admin
This crispy air fryer KFC chicken combines buttermilk-marinated chicken with a seasoned flour coating for a crunchy, browned exterior and tender meat.
8
servings15
minutes20
minutes35
minutesIngredients
2 cups buttermilk
4 boneless chicken thighs, skin on
4 chicken legs, bone-in, skin on
1 1/4 cups all-purpose flour
1/2 cup potato starch
2 1/2 tsp smoked paprika
1 1/2 tsp garlic powder
1 tsp chili powder
1 tsp onion powder
1 tsp oregano (dried)
1 tsp thyme (dried)
1 1/4 tsp white pepper
1 1/2 tsp mustard powder
2 tsp kosher salt
2 tsp nutritional yeast (optional)
avocado oil spray
flaky salt (for topping)
Directions
- Pour the buttermilk into a large bowl and add the chicken thighs and chicken legs. Cover and refrigerate overnight. When ready to cook, combine the supplied flour and seasoning ingredients with the salt and nutritional yeast, if using.
- Remove the chicken from the refrigerator. Add approximately 1/4 cup of the buttermilk marinade to the flour mixture and stir to create small craggily pieces that will cling to the chicken.
- Prepare the chicken legs first. Coat each leg thoroughly in the flour mixture and tap off excess coating. Preheat the air fryer, set it to 370°F, place the legs in the basket, and spray them well with oil.
- Air fry the chicken legs for approximately 22–24 minutes, checking halfway through. Spray any dry or floury areas with additional oil if needed. Do not flip the chicken. Remove the cooked legs and place them on a wire rack over a parchment-lined baking sheet to keep them crisp.
- Coat the boneless chicken thighs using the same method. Air fry them at 350°F for 15 minutes, checking halfway and spraying any dry flour patches with oil. Do not flip the thighs.
- Increase the temperature to 360°F and cook the thighs for another 4–5 minutes, until browned and crisp on top. Sprinkle with the listed topping, then serve the chicken pieces together while warm.
Notes
- Storing Leftover Chicken:
If you have leftover air fryer chicken, place it in a sealed container and refrigerate it. The original recipe recommends using the leftovers within three days. Allowing the chicken to cool before storing helps prevent excess trapped steam inside the container. Keep the pieces covered until you are ready to reheat them. The coating will naturally soften somewhat after refrigeration. Reheating in the air fryer is the preferred method for bringing back some of the crisp texture. - Reheating Crispy Chicken:
To reheat the chicken, place the thighs or legs in the air fryer and cook at 350°F for about 5–7 minutes. Check the center before serving to make sure the chicken is heated through. Avoid reheating for much longer than necessary because the coating can become overly dry. The goal is to warm the chicken while allowing the exterior to become crisp again. For best results, arrange the pieces with enough room for air to circulate. Crowding the basket can make reheated chicken softer. - Common Coating Mistakes:
One common mistake is failing to coat the chicken thoroughly. Any exposed area can remain less crisp than the rest of the piece. Another issue is leaving too much loose flour on the chicken. Tap off excess flour before placing the pieces into the air fryer so the coating stays attached to the chicken. It is also important to check the chicken halfway through cooking. Dry floury areas can be lightly sprayed with oil before the cooking continues.