Homemade marshmallows are soft, fluffy, and much tastier than store-bought ones. When you make them at home, you can control the flavor, sweetness, and texture. These marshmallows are perfect for hot chocolate, desserts, or just eating as a sweet snack.
Making marshmallows may look difficult at first, but if you follow the steps carefully, it becomes simple and fun. The process mainly includes preparing sugar syrup, mixing it with gelatin, and whipping everything into a fluffy texture. Then you let it set and cut into pieces.
First, let’s understand what makes marshmallows soft and airy. Gelatin is the key ingredient. It helps the mixture become firm but still soft and bouncy. Sugar syrup gives sweetness and structure. When you whip the mixture, air goes inside and creates that light, fluffy texture we all love.
Before starting, it is important to prepare your tools and workspace. You will need a saucepan, a mixing bowl, a hand mixer or stand mixer, and a tray for setting the marshmallows. Grease the tray or line it with baking paper so the marshmallows do not stick.
Now, begin by blooming the gelatin. This means soaking gelatin in water so it becomes soft. Let it sit for a few minutes. This step is important because it helps gelatin mix smoothly later.
Next, prepare the sugar syrup. In a saucepan, combine sugar, water, and other required ingredients. Heat the mixture slowly and let the sugar dissolve completely. Then cook it until it reaches the right temperature. This step needs attention because overheating or underheating can affect the final texture.
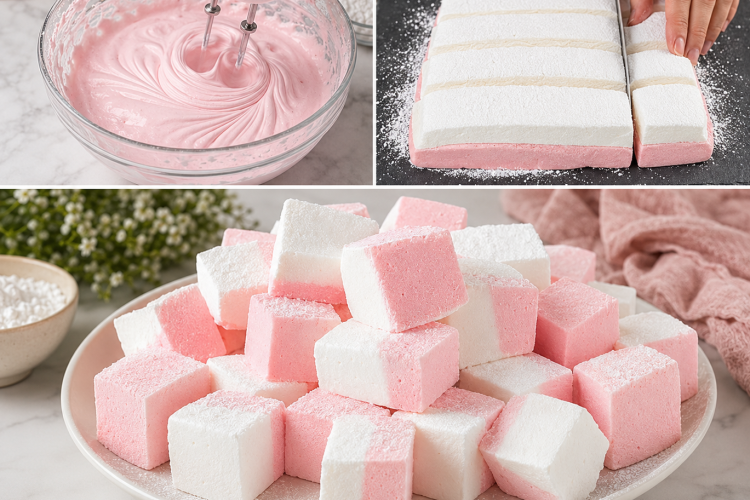
Once the sugar syrup is ready, slowly pour it into the gelatin mixture. Be careful while doing this because the syrup is very hot. Start mixing at low speed, then increase the speed. As you mix, the liquid will slowly turn thick, white, and fluffy. This step may take several minutes, so be patient.
When the mixture becomes thick and forms soft peaks, it is ready. At this stage, you can add flavor like vanilla extract. Mix it well so the flavor spreads evenly.
Now quickly pour the mixture into the prepared tray. Use a spatula to spread it evenly. The mixture is sticky, so you can lightly grease the spatula to make it easier.
Let the marshmallows rest at room temperature for several hours or overnight. During this time, they will firm up and become easy to cut.
Once set, sprinkle some powdered sugar or cornstarch on top. This helps reduce stickiness. Remove the marshmallow slab from the tray and place it on a cutting board. Use a knife or scissors to cut into squares or any shape you like.
Coat each piece lightly with powdered sugar so they don’t stick together. Now your homemade marshmallows are ready to enjoy.
These marshmallows are very soft and fresh. You can store them in an airtight container for several days. Keep them in a cool, dry place.
You can also try different variations. Add food color for fun shapes, or use different flavors like strawberry, chocolate, or lemon. Homemade marshmallows are also great for gifting.
Making marshmallows at home is a rewarding experience. It may take some time, but the result is worth it. Once you try it, you may never want to buy store marshmallows again.
Short Recipe
Description:
Soft, fluffy homemade marshmallows that are fresh, sweet, and perfect for snacks or desserts.
Duration:
Preparation time: 20 minutes
Cooking time: 10–15 minutes
Setting time: 4–6 hours (or overnight)
Ingredients:
- Gelatin
- Water
- Sugar
- (Any other ingredients remain the same as original recipe)
Instructions:
- Soak gelatin in water and let it sit until soft.
- In a saucepan, heat sugar and water until fully dissolved and cooked properly.
- Slowly pour hot syrup into the gelatin while mixing.
- Beat the mixture until it becomes thick, white, and fluffy.
- Add flavor and mix well.
- Pour into a greased tray and spread evenly.
- Let it set for several hours.
- Cut into pieces and coat with powdered sugar.
Tips & Tricks:
- Grease tools to avoid sticking.
- Do not overcook sugar syrup.
- Mix long enough to get a fluffy texture.
Notes:
- Store in an airtight container.
- Keep in a cool, dry place.
- Use clean, dry tools for best results.