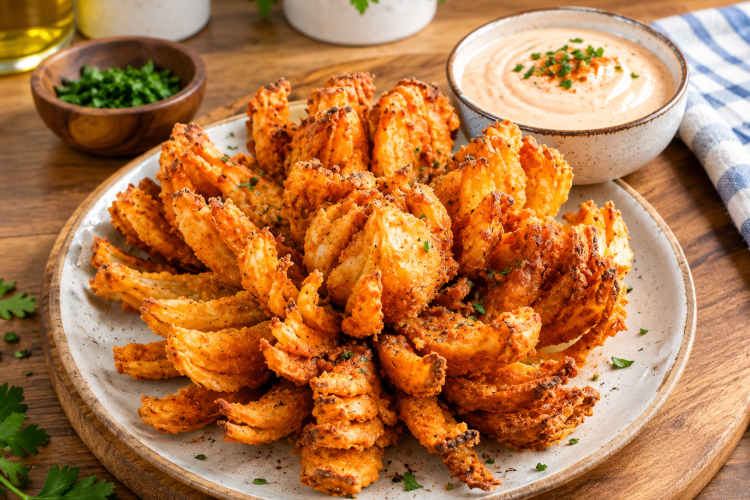
Air Fryer Blooming Onion is a crispy, flavorful appetizer that brings the fun of a restaurant-style blooming onion straight to your kitchen. A large sweet onion is carefully cut into thin petals, coated with seasoned flour, dipped into an egg and milk mixture, coated again, and cooked in the air fryer until golden and crisp. It is an eye-catching appetizer that works especially well for family gatherings, game days, parties, casual dinners, and any occasion when you want something a little more exciting than ordinary fried snacks.
The impressive flower shape may make this recipe look complicated, but the technique is easier once you understand how the onion needs to be cut. The most important detail is keeping the root intact while making the cuts. The root holds the onion together and allows the layers to spread outward during cooking. Once the onion has been cut properly, the remaining preparation involves a simple seasoned flour coating, an egg and milk dip, a second coating, and air frying.
Why Make Blooming Onion in an Air Fryer?
A Convenient Alternative to Deep Frying
Traditional blooming onions are usually deep fried, which means heating a considerable amount of oil and carefully lowering a large coated onion into it. Air frying provides a more convenient approach for home cooks because you do not need a large pot of hot oil. The air fryer uses circulating hot air to cook the coating and create a crisp, browned exterior while requiring only oil from a spray bottle.
This method also makes cleanup easier because there is no large quantity of leftover frying oil to deal with after cooking. You can prepare the onion, preheat the air fryer, transfer the coated onion into the basket, and let the appliance do most of the cooking. For anyone who enjoys crispy appetizers but prefers not to deep fry at home, this is a practical way to prepare a blooming onion.
Although air frying uses less oil than traditional deep frying, this recipe is still best considered an indulgent appetizer rather than a health food. The seasoned flour coating, eggs, milk, and oil contribute to its rich texture and flavor. The appeal is that you can enjoy a fun, crispy blooming onion without the deep-frying process normally associated with this appetizer.
Choosing the Best Onion
Use a Large Sweet Onion
The main ingredient is a large sweet onion. A sweet onion works particularly well because its flavor pairs nicely with the savory and slightly spicy seasoned flour coating. A Vidalia-style onion is a good choice, although the original recipe also notes that yellow or white onions can be used.
Size matters because the onion needs enough layers to create the blooming effect. A large onion provides more petals and gives the finished appetizer its attractive flower-like appearance. Choose an onion that feels firm and has a healthy, intact root. Since the root is responsible for keeping the petals attached, it is important not to damage or remove it before cutting.
How to Cut a Blooming Onion
The Root Is the Key
Cutting the onion correctly is the most important technique in this recipe. The goal is to create approximately 16 evenly spaced sections while leaving the root area untouched. If the cuts extend too close to or through the root, the onion may fall apart instead of opening into a bloom.
Begin by cutting about 1/2 inch from the top of the onion. Remove the outer papery skin, then place the onion on a cutting board with the cut side down and the root facing upward. Starting approximately 1/2 inch away from the root, make a straight downward cut all the way to the cutting board.
Repeat the process to create four evenly spaced cuts around the onion. Then make three additional cuts between each of those sections. When finished, you should have approximately 16 evenly spaced cuts running toward the center while the root remains intact.
Turn the onion over after cutting and let it rest for five minutes. This allows the petals to relax and begin separating naturally. Before breading, gently separate the outer onion pieces with your fingers. Work carefully so the petals remain attached at the center.
Preparing the Seasoned Flour
Build Flavor Into the Coating
The seasoned flour creates the flavorful crust that becomes crisp during air frying. The original ingredient list combines all-purpose flour with paprika, cayenne pepper, ground cumin, dried thyme, dried oregano, salt, and pepper. This combination provides a savory coating with a noticeable blend of herbs and spices.
Whisk the flour and seasonings together in a large bowl. Mixing everything thoroughly is important because the onion has many individual petals, and you want the seasoning to be distributed throughout the coating rather than concentrated in only a few areas.
The recipe uses 2 ½ cups of flour, although you will not necessarily use every bit of it. Extra flour is helpful because a blooming onion has many small spaces between its petals. Having enough flour makes it easier to coat those areas thoroughly without trying to conserve the mixture.
Preparing the Egg and Milk Mixture
Create a Moist Layer for the Second Coating
In a separate medium deep bowl, combine the two large eggs, milk, and water. Whisk everything together until the eggs are broken up and the mixture is evenly combined. This liquid mixture provides the layer needed to help the second coating of seasoned flour stick to the onion.
Once the onion has received its first flour coating, carefully dip it into the egg mixture. Make sure the liquid reaches the petals as evenly as possible. Lift the onion from the bowl and allow excess mixture to drip back into the bowl before continuing.
Taking a moment to let the excess liquid drain helps prevent an overly wet coating. The goal is to have enough moisture for the second flour layer to adhere without leaving large amounts of liquid dripping from the onion.
Coating the Onion Twice
Work the Flour Between the Petals
Place the cut onion into a clean bowl with the cut side facing upward. Pour the seasoned flour over the onion and use your fingers or a spoon to gently work the flour between the petals. The coating should reach as many of the cut surfaces as possible.
After the first flour coating, turn the onion over and gently tap away excess flour. Keep the remaining seasoned flour because it will be used again after the egg mixture.
Dip the onion into the egg, milk, and water mixture and coat it evenly. Let the excess liquid drip away, then return the onion to the reserved flour mixture. Coat the onion a second time, again paying attention to the spaces between the petals.
Once the second coating is complete, gently tap off excess flour. There will be leftover flour in the bowl, and that is expected. A thin, even layer is more useful than large amounts of loose flour sitting on the onion.
Refrigerating the Coated Onion
Let the Coating Set Before Cooking
After the onion has been completely coated, place it in the refrigerator while the air fryer preheats. This gives the coating time to settle and also makes the onion easier to handle before it goes into the hot air fryer basket.
The blooming onion is naturally delicate because it has been cut into many sections. Refrigerating it before cooking helps you handle it carefully without disturbing the coating. Keep the onion chilled while you prepare the air fryer for the cooking stage.
Preheating the Air Fryer
Set It to 350°F
Preheat the air fryer to 350°F for 10 minutes. For some recipes, preheating may not make a major difference, but it is important for this blooming onion. Starting with a hot air fryer helps the coated onion begin cooking immediately when it enters the basket.
While the air fryer heats, keep the coated onion in the refrigerator. Once the appliance has reached the required temperature, prepare the onion for transfer.
Using an Aluminum Foil Sling
Make the Transfer Easier
An aluminum foil sling is a useful way to move the blooming onion into the hot air fryer basket. The basket will be hot after preheating, and trying to place a large coated onion into it with your bare hands can be awkward and unsafe.
Place a sheet of aluminum foil beneath the onion and use it as a sling. Carefully transfer the onion into the air fryer basket with the cut side facing upward. Handle it gently to prevent the petals from breaking away or the flour coating from falling off.
The foil sling can also make removing the finished onion easier. Because the blooming onion is large and delicate, lifting it directly from the basket can cause the petals to separate. Using the foil underneath provides additional support.
Air Frying the Blooming Onion
Cook Until Golden Brown
Before cooking, spray the coated onion generously with oil. Place it into the preheated air fryer basket using the foil sling. Cook the blooming onion at 350°F for approximately 25 minutes.
During cooking, spray the onion with additional oil two or three times. Pay close attention to areas where flour remains visibly dry. These spots need some oil to help the flour brown and crisp during cooking.
The onion should gradually develop a golden-brown exterior. As it nears completion, the tips of the petals may become slightly darker. This is a useful indication that the coating has browned and the blooming onion is ready.
How to Tell When It Is Done
Look for a Golden, Crisp Exterior
The finished Air Fryer Blooming Onion should have a golden-brown coating with crisp-looking petals. The tips may be slightly darker than the rest of the coating, but watch them carefully during the final minutes because the thinner edges can brown faster.
If the onion does not look sufficiently browned after the recommended cooking time, continue cooking for a few additional minutes. Check it carefully rather than leaving it unattended, as the coating can become too dark if it cooks for too long.
When the onion is finished, carefully use the aluminum foil sling to lift it from the air fryer basket. Season with salt and pepper, then serve it with blooming onion dip while the coating is still crisp.
Using Oil for the Best Crisping
Spray the Dry Flour During Cooking
Oil plays an important role in helping the flour coating brown. Because the blooming onion has many petals and recessed areas, some flour may remain visible after the coating process. Spraying these areas with oil helps them cook more evenly.
The original recipe recommends using oil in a spray bottle. Olive oil is one option, while canola oil can also be used. The important point is to use a spray bottle suitable for oil and apply enough to cover dry areas without heavily soaking the coating.
The original recipe also cautions against using aerosol cooking oil because preservatives in some aerosol products may damage the coating of an air fryer basket over time. A refillable oil spray bottle provides a convenient alternative for this recipe and other air fryer dishes.
Serving Air Fryer Blooming Onion
Serve It Fresh With Dip
An Air Fryer Blooming Onion is best served soon after cooking while the seasoned coating is hot and crisp. Place the finished onion on a serving plate and offer blooming onion dip alongside it. Each petal can be pulled away and dipped, making the appetizer naturally suited to sharing.
This recipe is especially enjoyable for game day, parties, family gatherings, casual entertaining, or weekend snacks. The flower-like presentation makes it more visually interesting than ordinary onion rings or fried vegetables, while the individual petals make it easy for everyone to serve themselves.
Because the crisp coating can soften as it sits, serving the blooming onion soon after it comes out of the air fryer gives you the best texture. If you are preparing other foods at the same time, aim to make the onion close to serving time.
Common Mistakes to Avoid
Cutting Through the Root
The most important mistake to avoid is cutting through the root. The root is what keeps the onion connected. Always begin approximately 1/2 inch away from it and make sure the cuts stop before reaching that central area.
Using an Unsharp Knife
A sharp knife makes it easier to create clean, controlled cuts. Because the onion requires several cuts, using a dull knife can make the process more difficult and may crush the onion layers instead of slicing through them cleanly.
Skipping the Five-Minute Rest
Allow the cut onion to rest for five minutes before coating it. This gives the petals time to relax and makes it easier to gently separate the outer sections before breading.
Applying Too Much Loose Flour
The onion needs a coating, but large amounts of loose flour are not necessary. After each flour stage, gently tap away the excess. The goal is an even coating that stays attached to the onion petals.
Forgetting to Spray Oil
Dry flour will not brown as effectively without oil. Spray the onion before cooking and continue spraying two or three times during air frying. Focus especially on any areas where you can still see dry flour.
Notes for Making the Recipe
Preparation Notes
Keep the root intact from the beginning of the cutting process through the final cooking stage. A sharp knife and evenly spaced cuts will help create a more attractive blooming shape. After cutting, let the onion rest for five minutes and gently separate the outer petals before starting the coating process.
Cooking Notes
Preheat the air fryer to 350°F for 10 minutes. Transfer the onion carefully using an aluminum foil sling because the basket will be hot. During the 25-minute cooking period, spray the onion with oil two or three times, particularly where dry flour is visible.
Serving Notes
Once the coating is golden brown and the petal tips are beginning to darken, remove the onion carefully using the foil sling. Season with salt and pepper and serve immediately with blooming onion dip for the best crisp texture.
Why This Air Fryer Blooming Onion Works
The recipe succeeds because each preparation stage has a specific purpose. The intact root keeps the onion together, while the multiple cuts allow the layers to open into individual petals. The seasoned flour provides flavor and the beginnings of the crisp coating, while the egg, milk, and water mixture creates a surface for the second layer of flour to adhere to.
Air frying then brings all those elements together. The circulating heat cooks the coating around the onion, while the sprayed oil helps the flour become golden and crisp. The sweet onion softens as it cooks, creating a tender interior beneath the seasoned exterior.
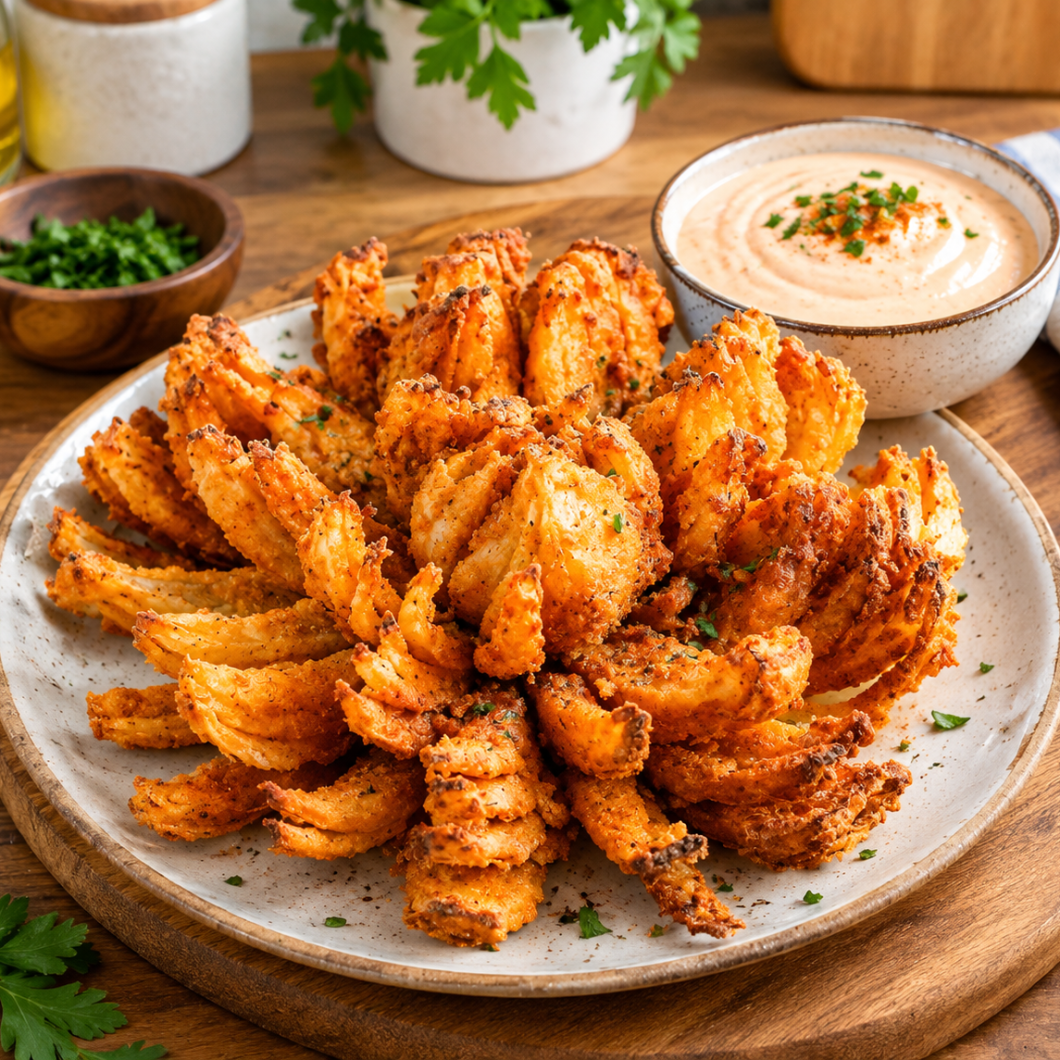
Air Fryer Blooming Onion
 Recipe by admin
This Air Fryer Blooming Onion is a crispy, golden-brown appetizer made with a large sweet onion, seasoned flour, eggs, milk, and spices.
6
servings10
minutes25
minutes65
kcal35
minutesIngredients
1 large sweet onion
2 ½ cups all-purpose flour
1 tablespoon paprika
1 teaspoon cayenne pepper
½ teaspoon ground cumin
½ teaspoon dried thyme
½ teaspoon dried oregano
2 large eggs
1 cup milk
1 cup water
Salt and pepper to taste
Oil in a spray bottle
Directions
- Cut 1/2 inch from the top of the sweet onion and remove the outer papery skin, keeping the root intact.
- Place the onion cut-side down with the root facing upward. Starting approximately 1/2 inch away from the root, make a downward cut all the way through to the cutting board.
- Make four evenly spaced cuts around the onion. Add three additional cuts between each section until you have approximately 16 evenly spaced cuts.
- Turn the onion over and allow it to rest for 5 minutes so the petals can relax.
- Gently separate the outer onion pieces with your fingers before beginning the coating process.
- In a large bowl, whisk together the all-purpose flour, paprika, cayenne pepper, ground cumin, dried thyme, dried oregano, salt, and pepper.
- In a separate medium deep bowl, whisk together the eggs, milk, and water.
- Place the onion in a clean bowl with the cut side facing upward. Pour the seasoned flour mixture over the onion and carefully coat the petals, working flour between the layers.
- Turn the onion over and gently tap away excess flour. Reserve the remaining flour mixture.
- Dip the floured onion into the egg, milk, and water mixture, coating it evenly. Allow excess liquid to drip back into the bowl.
- Return the onion to the reserved seasoned flour and coat it again. Gently tap off excess flour.
- Place the coated onion in the refrigerator while preparing the air fryer.
- Preheat the air fryer to 350°F for 10 minutes.
- Remove the onion from the refrigerator and spray it generously with oil.
- Make a sling from aluminum foil and use it to carefully transfer the onion, cut side up, into the hot air fryer basket.
- Cook at 350°F for approximately 25 minutes.
- Spray the onion with cooking oil two or three times during cooking, especially wherever dry flour remains visible.
- When the onion is golden brown and the petal tips are beginning to darken, carefully remove it using the aluminum foil sling.
- Season with salt and pepper.
- Serve immediately with blooming onion dip.
Nutrition Facts
- Calories: 65kcal
- Fat: 7g
- Carbohydrates: 1g
- Sugar: 1g