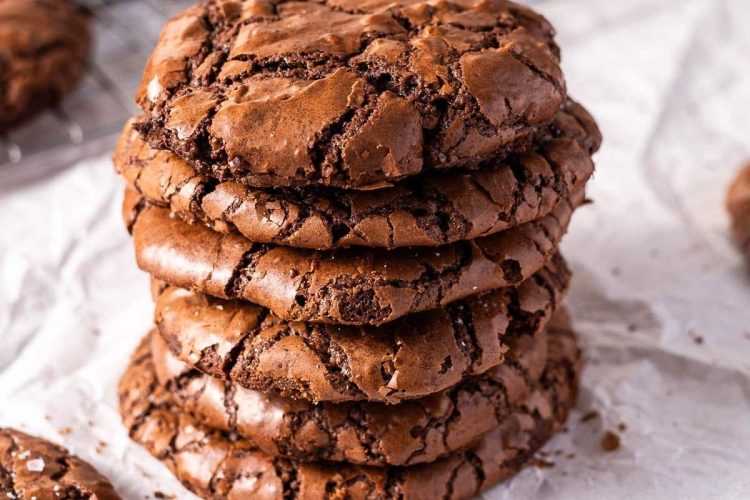
These Gluten-Free Sourdough Brownie Cookies are a delicious mix of two favourite desserts: rich chocolate brownies and soft, chewy cookies. They have shiny, crackly tops like freshly baked brownies and soft, fudgy centres that melt in your mouth. Each cookie is full of deep chocolate flavour, with a little extra richness from browned butter and a gentle tang from sourdough discard.
This recipe is a lovely way to use leftover sourdough starter while making something special for your family. You do not need regular wheat flour to create these chocolatey cookies. Instead, cocoa powder and tapioca flour help give them their structure and soft texture. This makes them a suitable choice for people who need to avoid gluten, provided all ingredients are certified gluten-free and cross-contact is avoided.
The recipe uses simple ingredients, including dark chocolate, butter, caster sugar, an egg, sourdough discard, cocoa powder, tapioca flour, baking powder and salt. Vanilla bean paste is optional, while a small sprinkle of sea salt flakes adds a pleasant contrast to the sweetness of the chocolate.
One of the best things about these cookies is that they look impressive without requiring complicated decorating. Their shiny tops, rich brown colour and slightly crackled surface make them attractive enough for parties, afternoon tea, family gatherings or homemade dessert gifts.
What Makes These Brownie Cookies Special?
Brownie cookies offer the best parts of brownies and cookies in one small treat. Traditional brownies are usually baked in a pan and cut into squares, while cookies are shaped individually before baking. This recipe combines the two ideas by using a rich, brownie-like batter that can be scooped onto baking trays.
The outside develops a delicate surface as the cookies bake, while the centres stay soft and fudgy. Because each portion is baked separately, the cookies are easy to serve and share. You can place them on a dessert plate, pack them for a gathering or enjoy one with your favourite hot drink.
Dark chocolate gives these cookies their strong chocolate flavour. The addition of cocoa powder deepens that flavour and helps create the familiar taste of a brownie. Browned butter brings a warm, nutty note that makes the chocolate taste even richer.
Sourdough discard is another important ingredient. It provides a subtle tang that balances the sweetness and adds another layer of flavour. The finished cookies should taste chocolatey rather than sour, so the sourdough does not overpower the other ingredients.
Why Use Sourdough Discard in Chocolate Cookies?
Sourdough discard is the portion of sourdough starter that is removed during regular starter maintenance. Instead of throwing it away, you can use it in different recipes, including pancakes, cakes, muffins and chocolate desserts.
In this recipe, the discard adds moisture and a slight tang to the brownie-cookie mixture. Chocolate has a strong flavour, which works well with the mild acidity of sourdough. The two ingredients complement each other and create a more rounded taste.
You do not need to rely on the sourdough discard to make the cookies rise. Baking powder is included in the ingredient list, and the recipe’s texture also depends on beating the egg and sugar until the mixture becomes pale and fluffy.
The recipe can use sourdough discard or starter that is on the rise, as stated in the ingredients. This makes it a convenient option when you have extra starter available and want to turn it into a sweet treat.
Another advantage is that you can use your starter without needing to prepare a separate sourdough baking project. Once your ingredients are ready, the mixture comes together in a few simple stages.
How Tapioca Flour Helps Keep the Recipe Gluten-Free
Many gluten-free baking recipes use a ready-made flour blend. This recipe takes a different approach by combining tapioca flour with cocoa powder.
Tapioca flour is made from cassava root. In baking, it can help create a soft, slightly chewy texture. That quality works well in brownie cookies because the goal is to keep the centres tender rather than dry or crumbly.
Cocoa powder also contributes to the structure of the mixture while giving it a strong chocolate taste. Together, these ingredients replace the need for ordinary wheat flour in this particular recipe.
However, not every cocoa powder, tapioca flour, baking powder or sourdough starter is automatically safe for someone with coeliac disease or a serious gluten sensitivity. Check product labels and make sure the sourdough starter itself is made with gluten-free ingredients. Use clean equipment and baking trays to avoid cross-contact with wheat flour.
When the ingredients are suitable, this recipe offers a useful alternative to conventional brownie cookies without requiring a commercial gluten-free flour blend.
Ingredients You Need
Before starting, measure all the ingredients and place them near your work area. Having everything ready makes the preparation easier, especially because the chocolate mixture and whipped egg mixture need to be combined smoothly.
- 50 g butter: The butter is browned first to create a nutty aroma and deeper flavour. After browning, the recipe aims for about 40 g of butter.
- 200 g dark chocolate: Use sweetened cooking chocolate with around 70% cocoa content. It provides the main chocolate flavour and helps give the cookies their fudgy centres.
- 150 g caster sugar: Fine sugar dissolves more easily when beaten with the egg and helps produce the shiny, crackled surface.
- 1 extra-large egg: The egg binds the ingredients and helps create the light, fluffy mixture needed for the cookie tops.
- 110 g sourdough starter discard or starter on the rise: This adds moisture and a gentle tang that balances the rich chocolate.
- 20 g cocoa powder: Cocoa powder deepens the chocolate flavour and contributes to the texture.
- 20 g tapioca flour: This gluten-free flour helps the cookies hold together and gives them a soft, chewy quality.
- ¼ teaspoon baking powder: Baking powder helps the cookies develop their texture as they bake.
- ¼–½ teaspoon fine salt: Salt balances the sweetness and brings out the chocolate flavour.
- 1 teaspoon vanilla bean paste, optional: Vanilla adds a warm aroma and complements the dark chocolate.
- Sea salt flakes, for finishing: A small sprinkle on top adds a light salty contrast to the sweet cookies.
Measure the ingredients carefully because the recipe uses small quantities of flour and cocoa powder. Changing the balance can affect how the batter spreads and how the cookies set.
Why Browned Butter Makes a Difference
Browned butter is one of the ingredients that gives these cookies their special flavour. Rather than simply melting the butter, you heat it until the milk solids turn golden and release a toasted, nutty aroma.
This process adds more depth to the finished cookies. The flavour is especially noticeable alongside dark chocolate because it brings a warm, almost caramel-like note to the mixture.
To brown the butter, place it in a small saucepan over moderate heat. Allow it to melt and continue cooking while watching it carefully. As the butter heats, it may foam, and the milk solids will begin to turn golden. Swirl the pan gently if needed so the butter browns evenly.
Remove the pan from the heat when the butter has a golden colour and a nutty smell. Do not leave it unattended, as the milk solids can move from golden to burnt quite quickly.
The original amount is 50 g of butter, but some moisture evaporates during browning. The recipe aims to leave approximately 40 g after this step. This browned butter is then combined with the dark chocolate.
How to Melt the Dark Chocolate
Once the butter is browned, the next step is to melt the chocolate gently. A double boiler is useful because it provides indirect heat and helps prevent the chocolate from burning.
Fill a saucepan about halfway with water and place it over medium heat. Transfer the browned butter to a heatproof bowl and set the bowl over the saucepan. The bottom of the bowl should not touch the water.
Add the chopped dark chocolate to the bowl. Stir from time to time as the chocolate melts into the butter. Continue until the mixture is smooth and no large pieces of chocolate remain.
Avoid allowing water or steam to get into the chocolate, as this can affect its texture. Keep the heat gentle rather than allowing the water to boil too vigorously.
When the chocolate and butter are fully melted, remove the bowl from the saucepan and set it aside. Let the mixture cool slightly if it is very hot before adding it to the beaten egg mixture.
Gentle melting helps create a smooth chocolate mixture that can blend evenly into the batter. This is important because the final cookies should have a consistent chocolate flavour and a soft, rich centre.
The Secret to Shiny, Crackly Cookie Tops
One of the most attractive features of brownie cookies is their shiny, crackled surface. In this recipe, beating the egg and caster sugar for long enough is an important part of achieving that finish.
Place the caster sugar and extra-large egg in the bowl of a stand mixer fitted with the whisk attachment. Beat them on medium-high speed for around 7–10 minutes.
At first, the mixture may look thick and yellow. As you continue whisking, it should become paler, lighter and slightly fluffy. This extended mixing helps create the surface texture that makes the cookies resemble brownies.
Avoid shortening this step too much. If the egg and sugar mixture is not sufficiently whipped, the cookies may not develop the same shiny appearance.
While the egg mixture is being beaten, you can prepare the dry ingredients in a separate bowl. This helps keep the process organised and means everything will be ready when it is time to combine the batter.
Preparing the Dry Ingredients
In a separate bowl, add the cocoa powder, tapioca flour, baking powder and fine salt. Whisk them together until the mixture looks even.
This simple step helps distribute the baking powder and salt throughout the dry ingredients. If these ingredients are not mixed well, some cookies may have a different flavour or texture from others.
Breaking up any lumps in the cocoa powder is also helpful. Cocoa can sometimes form small clumps, and whisking makes it easier to blend into the wet ingredients.
Keep the dry mixture ready until the egg, sugar, sourdough starter and melted chocolate have been combined.
Combining the Wet Ingredients
When the egg and sugar mixture becomes pale and fluffy, reduce the mixer speed to low. Add the sourdough starter gradually, allowing it to blend into the mixture.
Next, slowly pour in the melted chocolate and browned butter. Continue mixing until the chocolate is evenly distributed and the mixture looks smooth.
Take your time when adding the chocolate. Pouring it in too quickly or failing to mix properly may leave streaks or pockets of chocolate in the batter.
Use a spatula to scrape down the sides of the bowl when necessary. This helps bring any ingredients sticking to the edges back into the mixture.
The mixture should now have a rich chocolate colour and a smooth appearance. It will become thicker as you add the dry ingredients, but it will remain softer than traditional cookie dough.
Adding the Dry Mixture
Add the cocoa and tapioca flour mixture a little at a time. Allow each addition to mix in before adding the next portion.
Gradual mixing makes it easier to prevent dry pockets from forming in the batter. It also helps you maintain an even texture without overworking the mixture.
Pause occasionally to scrape down the sides and bottom of the bowl with a spatula. Ingredients can collect in these areas, so checking the bowl helps ensure that everything is combined.
Once the dry ingredients have been added, the batter should be thick but still soft enough to scoop with spoons. It will not feel as firm as dough for many traditional cookies, and that is normal for this recipe.
If you are using vanilla bean paste, briefly switch off the mixer before adding it. Vanilla paste can be sticky and may cling to the whisk. Add it to the bowl, then turn the mixer back on and mix until it is evenly incorporated.
Preparing the Baking Trays
Preheat your oven to 180°C (320°F), as stated in the original recipe. Since oven temperature conversions can vary by convention and appliance, check that your oven setting matches the temperature you intend to use.
Prepare two large baking trays by lightly greasing or moistening them. Line each tray with baking paper.
A little moisture beneath the paper helps hold it in place while you scoop the batter. This is useful because brownie-cookie batter is softer and stickier than ordinary cookie dough.
Make sure the paper lies flat enough for the cookies to be placed securely. Preparing both trays before scooping saves time and makes it easier to move the cookies into the oven once the batter is portioned.
Scooping and Shaping the Cookies
Use two spoons to portion the batter onto the prepared trays. Scoop approximately 1½ tablespoons of batter per cookie.
Place the portions far enough apart to allow them to spread as they bake. If the cookies are too close together, they may spread into one another and lose their individual shape.
Try to make each portion a reasonably rounded mound. The batter does not need to be shaped perfectly, but evenly sized portions help the cookies bake at a similar rate.
Once all the portions are arranged on the trays, sprinkle a small pinch of sea salt flakes over each cookie. The salt gives the finished cookies a pleasant contrast to the sweetness and richness of the chocolate.
Avoid adding too much sea salt, as the recipe already contains fine salt in the batter. A light finishing sprinkle is enough to bring out the chocolate flavour without making the cookies overly salty.
Baking the Brownie Cookies
Place the prepared trays in the preheated oven and bake the cookies for 6–7 minutes. Keep an eye on them as they bake because brownie cookies can become overbaked quickly.
The tops should develop a crackled appearance, while the centres should still feel soft. Do not wait until the cookies look completely firm in the oven. They will continue to set as they cool on the trays.
If you are baking both trays at the same time, swap their positions halfway through baking. Move the tray from the upper rack to the lower rack and the other tray in the opposite direction, where your oven layout allows. This helps the cookies bake more evenly if one area of your oven is hotter than another.
Ovens can vary, so start checking the cookies towards the end of the baking time. An extra minute may make a difference to their final texture. For a fudgy result, avoid baking them until they are completely dry.
The cookies should have a delicate surface with visible cracks and soft centres. Their appearance may seem slightly underdone when they first come out of the oven, but this is expected for a brownie-style cookie.
Why You Should Let the Cookies Cool
When the cookies have finished baking, remove the trays from the oven and leave the cookies on them. Do not try to lift them immediately because they will be delicate while hot.
As the cookies cool, their structure becomes firmer. This helps them hold together when you remove them from the baking paper. Moving them too soon may cause them to break or lose their shape.
For the best fudgy texture, allow the cookies to cool completely before serving. Although they may smell tempting straight from the oven, giving them time to rest makes a noticeable difference.
The outside becomes more stable while the centre stays soft and rich. Once cooled, the cookies should be easier to handle and serve without falling apart.
If you prefer slightly warm cookies, you can enjoy them after they have rested long enough to hold their shape. However, cooling them fully gives you the most reliable texture for storage and serving.
How to Store Gluten-Free Sourdough Brownie Cookies
Allow the cookies to cool completely before storing them. Place any leftovers in an airtight container and keep them in the refrigerator, following the original recipe’s storage recommendation.
Keeping the container sealed helps prevent the cookies from drying out and protects them from absorbing other food smells. Refrigeration is a practical choice for keeping the cookies fresh.
When you want to eat one, you can enjoy it straight from the refrigerator or allow it to sit at room temperature briefly if you prefer a softer bite.
For the best quality, check the cookies before eating and discard them if you notice mould, an unusual smell or other signs of spoilage. The original recipe does not give a specific storage duration, so avoid assuming they will remain fresh for a fixed number of days.
Ways to Serve These Chocolate Cookies
These cookies are rich enough to enjoy on their own, but they also work well with a range of simple accompaniments.
- With tea or coffee: The dark chocolate flavour pairs nicely with a hot cup of tea or coffee.
- As an after-dinner dessert: Serve one or two cookies on a small dessert plate when you want something sweet without preparing a large dessert.
- With ice cream: A cooled brownie cookie can be served alongside a scoop of vanilla ice cream for a simple dessert.
- On a dessert platter: Arrange the cookies with fresh berries and other small treats for a gathering.
- As a homemade gift: Once fully cooled, place them in a suitable food container and share them with friends or family. If gifting them to someone who avoids gluten, make sure all ingredients and preparation equipment are safe for their dietary needs.
Because the cookies have a rich chocolate taste, small portions can feel satisfying. The sea salt flakes also make them look attractive without the need for extra decoration.
Common Mistakes to Avoid
- A few small details can make a difference when preparing this recipe.
- Not browning the butter carefully: Butter can burn quickly once its milk solids begin to colour. Watch it closely and remove it from the heat when it becomes golden and smells nutty.
- Melting the chocolate over direct high heat: Chocolate can scorch easily. Using a heatproof bowl over a saucepan of hot water allows it to melt gently.
- Beating the egg and sugar for too little time: The recipe calls for 7–10 minutes of mixing. This helps the mixture become pale and fluffy, which contributes to the crackly cookie tops.
- Adding all the dry ingredients at once: Gradual mixing makes it easier to combine the cocoa powder and tapioca flour evenly.
- Placing the cookies too close together: The batter spreads during baking, so leave enough room between each portion.
- Baking for too long: The centres should remain soft when the cookies come out of the oven. They will firm up as they cool.
- Removing the cookies while they are hot: Letting them rest on the baking trays helps them set and makes them easier to lift.
Tips & Tricks for the Best Results
- Measure the butter before browning and aim for approximately 40 g after the browning process.
- Chop the dark chocolate into smaller pieces so it melts more evenly.
- Use an egg at room temperature to help the ingredients combine smoothly.
- Prepare the dry ingredients while the egg and sugar are being whipped to make the process more organised.
- Scrape the sides of the mixing bowl whenever needed to ensure that all ingredients are incorporated.
- Use two spoons to portion the soft batter without handling it too much.
- Keep the cookie portions similar in size so they bake at a similar rate.
- Sprinkle sea salt flakes lightly over the cookies before baking.
- Allow the cookies to cool on the trays before transferring them.
- Check that every ingredient, especially the sourdough starter and baking powder, is suitable for a gluten-free diet if required.
Gluten-Free Sourdough Brownie Cookies
Prep time
20 minutes
Cook time
15 minutes
Total time
35 minutes
Servings:
4 servings, as listed in the original recipe
Description
These gluten-free sourdough brownie cookies are made with dark chocolate, browned butter and sourdough discard. Cocoa powder and tapioca flour give them a soft, fudgy texture, while sea salt flakes add a light contrast to the chocolate sweetness.
Ingredients
- 50 g butter
- 200 g dark chocolate (70% sweetened cooking chocolate)
- 150 g caster sugar
- 1 extra-large egg
- 110 g sourdough starter discard or starter on the rise
- 20 g cocoa powder
- 20 g tapioca flour
- ¼ teaspoon baking powder
- ¼–½ teaspoon fine salt
- 1 teaspoon vanilla bean paste (optional)
- Sea salt flakes, for finishing
Instructions
- 1. Preheat the oven to 180°C (320°F). Brown the butter in a small saucepan until golden and fragrant. Aim for about 40 g of butter after browning.
- 2. Fill a saucepan halfway with water and heat it. Place a heatproof bowl on top without letting the bowl touch the water. Add the browned butter and dark chocolate, then stir until melted and smooth. Set aside.
- 3. Put the caster sugar and egg in a stand mixer fitted with a whisk attachment. Beat on medium-high speed for 7–10 minutes, until pale and fluffy.
- 4. In a separate bowl, whisk together the cocoa powder, tapioca flour, baking powder and fine salt.
- 5. Reduce the mixer speed to low and gradually add the sourdough starter. Slowly pour in the melted chocolate and butter mixture, mixing until combined.
- 6. Add the dry ingredients a little at a time, mixing after each addition. Scrape down the sides of the bowl as needed.
- 7. If using vanilla bean paste, briefly switch off the mixer, add the vanilla and mix again until combined.
- 8. Lightly grease or moisten two large baking trays and line them with baking paper.
- 9. Use two spoons to place about 1½ tablespoons of batter per cookie onto the trays. Leave space between each portion for spreading.
- 10. Sprinkle sea salt flakes over the cookies. Bake for 6–7 minutes, swapping the tray positions halfway through, until the tops are crackled and the centres remain soft.
- 11. Leave the cookies on the trays to firm up. Allow them to cool completely for the best texture. Store leftovers in an airtight container in the refrigerator.
Tips & Tricks
- Whip the egg and sugar for the full 7–10 minutes to help create crackly tops.
- Brown the butter carefully to avoid burning it.
- Leave enough space between the cookies because the batter spreads during baking.
- Do not overbake; the centres should still be soft when removed from the oven.
- Let the cookies cool before moving them, and refrigerate leftovers in an airtight container.
- For gluten-free baking, ensure the starter and all other ingredients are gluten-free and avoid cross-contact. Copy recipe card