Homemade Overnight Sourdough Pita Bread is a delicious way to make soft, flexible bread with a light sourdough flavor and a hollow pocket in the middle. These homemade pita breads are made with an active sourdough starter, water, olive oil, flour, and salt. The dough is prepared ahead of time, fermented at room temperature, and then placed in the refrigerator overnight. The next day, it is divided into small portions, rolled into thin circles, and baked on a very hot surface.
The best part of this recipe is that you do not need commercial yeast. The active sourdough starter helps the dough ferment naturally and gives the finished bread its special flavor. The long fermentation also makes the recipe easier to manage because you can prepare the dough one day and bake the pita breads the following day.
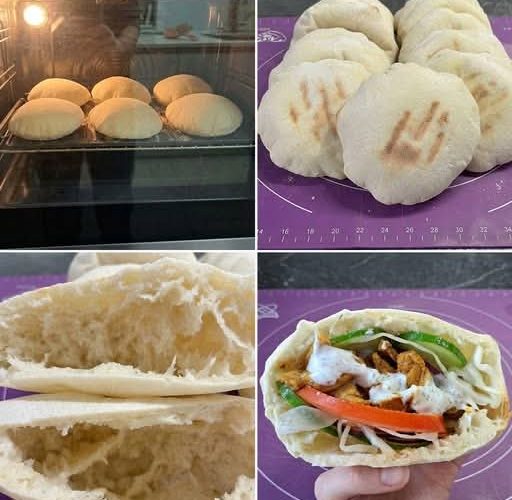
When the dough is rolled evenly and placed on a properly heated baking surface, the moisture inside turns into steam. This steam pushes the two sides of the dough apart, creating the familiar pita pocket. Once baked, the bread becomes soft, slightly chewy, and easy to fill with your favorite ingredients.
Homemade sourdough pita is perfect for lunch, dinner, snacks, and family meals. You can fill it with chicken, falafel, eggs, salad, or roasted vegetables. It is also delicious served warm with hummus and other dips.
If you enjoy baking bread at home, this overnight sourdough pita recipe is a useful addition to your collection. The ingredients are simple, the method is easy to follow, and most of the preparation time is spent allowing the dough to ferment and rest.
Why You Will Love This Sourdough Pita Recipe
There are many reasons to make sourdough pita bread at home. First, you can prepare it with a few basic ingredients that are easy to find in most kitchens. You do not need special flavorings or complicated equipment. An active sourdough starter, flour, water, olive oil, and salt are enough to make the dough.
Another reason to love this recipe is the overnight fermentation. Instead of preparing and baking the bread in one session, you can mix the dough during the day and allow it to rest in the refrigerator overnight. This makes the baking process more convenient and gives the dough extra time to develop its flavor.
The finished pita breads are soft and flexible when handled correctly. They can be opened and filled with different ingredients, making them useful for many meals. You can prepare them for a quick breakfast, pack them for lunch, or serve them with dinner.
The recipe also gives you control over the size and thickness of your bread. By dividing the dough into 15 equal portions, you can make pita breads that are similar in size. Rolling each portion evenly helps the bread puff during baking.
Finally, homemade pita can be stored for later use. You can keep the baked breads in an airtight container for up to two days or freeze them for up to three months. This means you can make a batch ahead of time and enjoy homemade bread whenever you need it.
Ingredients Needed for Overnight Sourdough Pita Bread
This recipe uses five main ingredients, along with a little extra flour for dusting the work surface. Each ingredient has a purpose in creating the right dough texture and finished bread.
Active Sourdough Starter
You will need 100 grams of active sourdough starter, which is approximately 1/2 cup. The starter provides the natural fermentation needed to develop the dough.
Use a starter that has been fed recently and has risen well. It should look bubbly and active rather than flat and inactive. An active starter helps the dough ferment properly during the first stage and the overnight rest.
Because sourdough starters can behave differently depending on their age, feeding schedule, and room temperature, look at their activity rather than relying only on a specific number of hours after feeding.
Lukewarm Water
Use 300 grams of lukewarm water, approximately 1 1/4 cups. The water helps bring the flour and starter together to form a soft dough.
The water should feel comfortably warm, not hot. Very hot water may harm the natural activity of the starter, while cold water can slow down fermentation.
Adding the water to the starter first makes it easier to mix the ingredients evenly before adding the flour.
Olive Oil
This recipe uses 25 grams of olive oil, approximately 2 tablespoons. Olive oil helps make the dough softer and more flexible.
It also makes the dough easier to handle during kneading and rolling. The finished pita bread has a tender texture that works well for sandwiches, wraps, and dipping.
Measure the olive oil carefully so that the dough keeps the intended balance of ingredients.
Bread Flour or All-Purpose Flour
You will need 500 grams of bread flour or all-purpose flour, approximately 4 cups. Flour provides the main structure of the pita bread.
Bread flour can give the dough a stronger structure because of its higher protein content. All-purpose flour is also suitable and can produce soft, delicious pita breads.
For the best results, weigh the flour with a kitchen scale if possible. Cup measurements can vary depending on how the flour is scooped and packed. Too much flour can make the dough stiff and difficult to roll.
Fine Sea Salt
Use 10 grams of fine sea salt, approximately 1 3/4 teaspoons. Salt improves the flavor of the bread and helps balance the natural taste of the sourdough starter.
Add the salt along with the flour so it can be mixed evenly throughout the dough. Accurate measurement is important because the recipe depends on the right balance of ingredients.
Additional Flour for Dusting
Keep a small amount of extra flour nearby for dusting the work surface and helping you handle the dough.
Use only as much as needed. Adding too much flour can make the dough dry and may affect how easily the pita breads puff during baking.
How Overnight Fermentation Improves the Bread
The overnight fermentation is an important part of this recipe. It allows the sourdough starter to work gradually while the dough develops its flavor and structure.
The process begins with a room-temperature fermentation lasting approximately 3 to 5 hours. During this time, the dough becomes smoother, lighter, and larger. It does not need to double in size. An increase of around 40 to 50 percent is a useful sign that fermentation is progressing.
After this first stage, the dough is covered and placed in the refrigerator for 8 to 16 hours. The cold temperature slows fermentation, allowing the dough to develop gradually without moving too quickly.
This longer process is convenient because you can prepare the dough in advance. You do not have to mix, shape, and bake everything immediately. The following day, the chilled dough can be divided and shaped into individual pita breads.
The exact fermentation time may vary depending on the temperature of your kitchen, the strength of your starter, and the type of flour you use. Pay attention to the dough’s appearance and texture rather than following the clock alone.
Preparing the Dough
Begin by taking a large mixing bowl and adding the active sourdough starter, lukewarm water, and olive oil. Stir these ingredients until the starter is mostly mixed into the water.
The mixture does not have to become completely smooth, but breaking up the starter helps distribute it more evenly through the dough.
Next, add the bread flour or all-purpose flour and fine sea salt. Mix everything until the flour has absorbed the liquid and no obvious dry patches remain.
At this stage, the dough may look rough, uneven, or slightly sticky. This is normal. You do not need to knead it immediately because the flour will continue absorbing the water during the resting period.
Cover the bowl and leave the dough to rest for 20 to 30 minutes. This short pause makes the dough easier to handle and reduces the amount of effort needed during kneading.
Kneading the Dough Until Smooth
After the dough has rested, begin kneading it. Work the dough for approximately 5 to 7 minutes, using your hands to stretch, fold, and press it until it becomes smoother and more elastic.
The dough should remain soft and slightly tacky. It should not feel extremely sticky, but it also should not be dry or stiff.
Try not to add extra flour every time the dough sticks lightly to your fingers. A little tackiness is helpful because a soft dough can stretch more easily when you roll it into thin pita rounds.
As you knead, you should notice the dough becoming more even and flexible. Once it has developed a smoother texture, return it to the mixing bowl.
Cover the bowl to protect the dough from drying out. It is now ready for the first fermentation stage.
First Fermentation at Room Temperature
Leave the covered dough at room temperature for approximately 3 to 5 hours.
During this time, the sourdough starter begins fermenting the dough. The dough gradually develops a lighter texture and becomes larger as fermentation progresses.
You do not need to wait for the dough to double in size. Instead, look for an increase of approximately 40 to 50 percent, along with a smoother appearance and a lighter feel.
The temperature of your kitchen can affect how quickly this stage takes place. A warm room may speed up fermentation, while a cooler room may slow it down.
If your starter is active and your kitchen is warm, the dough may be ready closer to the shorter end of the time range. In a cooler kitchen, it may need longer.
Once the dough has become noticeably larger and lighter, cover it tightly and prepare it for the overnight cold fermentation.
Refrigerating the Dough Overnight
Place the covered dough in the refrigerator for 8 to 16 hours.
This stage gives you more control over your baking schedule. You can prepare the dough during the day and finish the recipe the following morning or afternoon.
The refrigerator slows the activity of the sourdough starter while allowing the dough to continue developing flavor. The dough also becomes firmer as it cools, making it easier to divide into individual portions the next day.
Keep the bowl covered tightly so the surface does not dry out or absorb unwanted smells from the refrigerator.
When you are ready to bake, remove the dough and allow it to sit at room temperature for approximately 20 to 30 minutes. This brief rest helps take the chill off and makes the dough easier to handle.
Dividing and Shaping the Dough
Lightly flour your work surface and turn the chilled dough onto it. Divide the dough into 15 equal portions.
Each portion should weigh approximately 62 grams. Using a kitchen scale helps you make the pieces similar in size, which encourages more even baking.
Take one piece at a time and shape it into a smooth ball. Bring the edges together and gently roll the dough between your hands or on the work surface until the outside becomes reasonably smooth.
Avoid pulling the dough so tightly that the surface tears. You want each portion to have a smooth outer layer without creating cracks.
Place the shaped dough balls on a lightly floured surface. Keep them covered with a clean kitchen towel or another suitable cover while you work.
Covering the dough balls is important because exposed dough can dry out. A dry outer layer may crack when rolled and make it harder to create a smooth pita round.
Resting the Dough Balls
Once all the portions have been shaped, allow them to rest for 30 to 45 minutes while covered.
This resting time helps the gluten relax after the dough has been divided and shaped. Relaxed dough is easier to roll into circles without pulling back toward its original shape.
If you try to roll the dough immediately after shaping, it may resist stretching. You may find that the dough shrinks as you roll it or becomes difficult to shape evenly.
Giving the dough enough time to rest makes the next step much easier. It also helps you roll the portions without applying too much pressure.
Keep the dough balls covered during this stage to protect them from air and prevent the surfaces from drying.
Preheating the Oven and Baking Surface
A very hot baking surface is one of the most important parts of making pita bread with a pocket.
Place a cast-iron plate, baking steel, pizza stone, or heavy inverted baking sheet inside the oven. Preheat the oven to 500°F for at least 45 minutes.
Do not skip the full preheating time, even if the oven reaches the correct temperature earlier. The baking surface needs enough time to become thoroughly hot.
When the rolled dough touches the heated surface, the heat starts cooking it quickly. Moisture inside the dough turns into steam, pushing the layers apart and creating the hollow center.
If the surface is not hot enough, the dough may cook slowly without producing enough steam to puff properly. A fully heated surface gives the pita a better chance of forming the pocket.
Always handle the hot baking surface carefully. Use suitable oven protection and keep your hands away from the heated metal or stone.
Rolling the Pita Bread
After the dough balls have rested and the oven is fully heated, begin rolling the pita breads.
Take one dough ball and place it on a lightly floured surface. Use a rolling pin to roll it into an even circle approximately 5 to 6 inches wide and about 1/8 inch thick.
Try to keep the thickness consistent across the whole circle. The center should not be much thicker than the edges, and the edges should not become extremely thin.
Even thickness helps steam spread between the layers during baking. If some parts are thick while others are thin, the pita may puff unevenly or fail to form a complete pocket.
Roll gently rather than pressing too hard. The dough should remain smooth and should not tear.
Before baking, shake off any excess flour from the surface of each round. Loose flour can burn on the hot baking surface and create unwanted smoke or a bitter taste.
Baking the Pitas Until They Puff
Carefully place two or three rolled pita rounds on the fully heated baking surface. Leave enough space between them so they can expand without touching.
Bake for approximately 2 to 4 minutes. Watch the dough as it begins to cook.
As the moisture inside heats up, steam builds between the layers of dough. The pita may begin to rise in one area before expanding across the whole round. When the conditions are right, it can puff into a large, hollow balloon.
Once the pita has puffed fully and developed a light color, remove it from the oven. The bread does not need to become deeply brown to be ready.
Repeat the process with the remaining dough portions. Depending on the size of your baking surface, you may need to bake the pita breads in several batches.
Take care when placing and removing the dough because the oven and baking surface are extremely hot.
Keeping the Pita Breads Soft
As soon as each batch comes out of the oven, transfer the pita breads to a plate or basket and cover them with a clean kitchen towel.
This simple step helps hold in moisture while the bread cools. It keeps the pita soft and flexible, making it easier to cut open and fill later.
If the pita breads are left uncovered for too long, their surfaces may become dry. This can make them less flexible and more likely to crack when folded.
Allow the breads to cool slightly before serving. They may naturally deflate as they cool, but the hollow pocket should remain inside when the pita has puffed properly.
A small amount of crumb inside the pocket is normal. You can gently open the bread with a knife when you are ready to fill it.
Why Some Pita Breads Do Not Puff
Sometimes a pita bread may not puff completely, even when you follow the recipe. This can happen for several reasons, and the bread can still be useful.
One common reason is that the baking surface is not hot enough. The dough needs strong, immediate heat to create steam quickly. Preheating the surface at 500°F for at least 45 minutes helps provide the conditions needed for puffing.
Uneven rolling is another possible cause. If one side of the dough is much thicker than the other, steam may not spread evenly between the layers.
Weak or insufficient fermentation can also affect the dough’s structure. Using a recently fed, active starter and watching the dough during the first fermentation stage can help.
Rough handling during transfer may create folds, creases, or small tears. These can allow steam to escape before the pocket forms. Transfer each rolled round carefully and avoid folding it.
Too much flour on the underside can also affect contact with the baking surface. Shake away any loose flour before baking.
Even if a pita remains flat, you can still serve it as flatbread, use it for wraps, enjoy it with dips, or cut it into pieces to make pita chips.
Serving Ideas for Homemade Sourdough Pita
Homemade sourdough pita is easy to serve in many different ways.
For lunch, fill the pocket with cooked chicken, fresh vegetables, and your favorite sauce. You can also add falafel, lettuce, tomatoes, cucumber, or other sandwich fillings.
For breakfast, try filling the bread with cooked eggs and vegetables. The soft texture makes it suitable for simple breakfast sandwiches.
For a meat-free meal, combine falafel with fresh vegetables and serve the pita with hummus or another favorite dip.
You can also serve warm pita bread alongside soups, salads, grilled foods, or Mediterranean-inspired meals. Tear it into small pieces and use it to scoop up dips.
Because the bread has a mild fermented flavor, it works with a wide range of savory ingredients. You can keep the fillings simple or use whatever ingredients you already have available.
How to Store Homemade Pita Bread
Allow the pita breads to cool before storing them. Place them in an airtight container and keep them at room temperature for up to two days.
Sealing the bread helps reduce moisture loss and keeps the pita flexible. Avoid leaving the breads uncovered for long periods.
If you have made more pita than you can eat within two days, freezing is a convenient option.
Place a piece of parchment paper between the individual pita breads before freezing. This makes it easier to separate them later without breaking or tearing the bread.
The pita breads can be frozen for up to three months. Store them in a suitable freezer-safe container or bag to help protect their texture.
When you want to use them, take out the amount you need and allow them to thaw before serving or reheating.
Tips & Tricks for the Best Results
- Use an active starter: Choose a recently fed sourdough starter that has risen well and shows visible bubbles.
- Measure carefully: A digital kitchen scale helps you measure the ingredients and divide the dough evenly.
- Keep the dough soft: Avoid adding too much extra flour during kneading. The dough should remain soft and slightly tacky.
- Watch the fermentation: Look for a lighter, smoother dough that has grown by approximately 40 to 50 percent during the first fermentation.
- Cover the dough: Keep the bowl and dough portions covered to prevent the surfaces from drying out.
- Rest before rolling: Allow the dough balls to rest for 30 to 45 minutes so they stretch more easily.
- Roll evenly: Aim for rounds measuring 5 to 6 inches across and approximately 1/8 inch thick.
- Heat the baking surface fully: Preheat the oven and baking surface to 500°F for at least 45 minutes.
- Remove excess flour: Shake off loose flour before baking to prevent burning on the hot surface.
- Handle gently: Avoid folding, creasing, or tearing the rolled dough when transferring it to the oven.
- Do not overbake: Remove the pitas once they have puffed and developed a light color.
- Cover after baking: Place a clean kitchen towel over the freshly baked pita breads to help keep them soft.
- Store properly: Keep cooled pita in an airtight container for up to two days or freeze it for up to three months.
Homemade Overnight Sourdough Pita Bread
Soft, flexible pita bread with naturally fermented flavor and a hollow pocket.
Prep time
35 minutes
Cooking time
25 minutes
Yield
15 pita breads
Difficulty
Medium
Room-temperature fermentation: 3–5 hours · Overnight refrigeration: 8–16 hours · Additional resting: approximately 1–1½ hours
Description
Homemade sourdough pita bread made with active sourdough starter, olive oil, flour, water, and salt. The dough ferments at room temperature, rests in the refrigerator overnight, and is baked on a very hot surface to help create soft, hollow pita pockets. Serve with chicken, falafel, vegetables, eggs, hummus, or your favorite dips.
Ingredients
- 100 grams active sourdough starter (about 1/2 cup)
- 300 grams lukewarm water (about 1 1/4 cups)
- 25 grams olive oil (about 2 tablespoons)
- 500 grams bread flour or all-purpose flour (about 4 cups)
- 10 grams fine sea salt (about 1 3/4 teaspoons)
- Additional flour for dusting the work surface
Instructions
- Mix the liquids. Add the active sourdough starter, lukewarm water, and olive oil to a large bowl. Stir until the starter is mostly mixed into the water.
- Add the flour and salt. Mix in the flour and fine sea salt until all the dry flour is incorporated and a rough dough forms.
- Rest the dough. Cover the bowl and leave the dough for 20 to 30 minutes.
- Knead. Knead for 5 to 7 minutes until the dough becomes smoother and more elastic. Keep it soft and slightly tacky.
- Ferment at room temperature. Cover the dough and leave it for approximately 3 to 5 hours, until it becomes lighter, smoother, and about 40 to 50 percent larger.
- Refrigerate overnight. Cover the bowl tightly and refrigerate the dough for 8 to 16 hours.
- Take the chill off. Remove the dough from the refrigerator and leave it at room temperature for 20 to 30 minutes.
- Divide the dough. Turn it onto a lightly floured surface and divide it into 15 equal portions, approximately 62 grams each.
- Shape the portions. Form each piece into a smooth ball. Place the balls on a lightly floured surface and keep them covered.
- Rest the balls. Let the covered portions rest for 30 to 45 minutes so the dough becomes easier to roll.
- Preheat the oven. Place a cast-iron plate, baking steel, pizza stone, or heavy inverted baking sheet in the oven. Heat to 500°F for at least 45 minutes.
- Roll the pitas. Roll each ball into an even circle about 5 to 6 inches wide and approximately 1/8 inch thick.
- Bake. Carefully place two or three rounds on the hot baking surface. Bake for 2 to 4 minutes, until they puff and become lightly colored.
- Keep the bread soft. Transfer the baked pita breads to a plate or basket and immediately cover them with a clean kitchen towel.
- Finish baking. Continue rolling and baking the remaining dough portions.
- Cool and serve. Allow the pita breads to cool slightly before cutting or filling. They may deflate as they cool, but the hollow pockets should remain inside.
Tips & Tricks
- Use a recently fed, active sourdough starter that has risen well.
- Measure the ingredients with a digital kitchen scale for better accuracy.
- Do not add too much extra flour; the dough should remain soft and slightly tacky.
- Keep the dough balls covered while they rest to prevent drying.
- Roll the pita rounds evenly to help them puff.
- Preheat the baking surface to 500°F for at least 45 minutes.
- Shake off excess flour before placing the dough on the hot surface.
- Avoid folding, creasing, or tearing the rolled dough.
- Remove the pitas once they puff and become lightly colored.
- Cover freshly baked pita with a clean towel to help keep it soft.
- A small amount of crumb inside the pocket is normal.
- Pitas that do not puff completely can still be served as flatbread or made into pita chips.
- Store cooled pita in an airtight container at room temperature for up to 2 days.
- Freeze for up to 3 months, placing parchment paper between the pita breads.